Duotone Image Filtering with JavaScript
Learn how to perform basic image processing in Javascript, follow steps to create a duotone filter, and see how to implement this technique in your projects.
Updated: October 28, 2022 (originally published 2014)
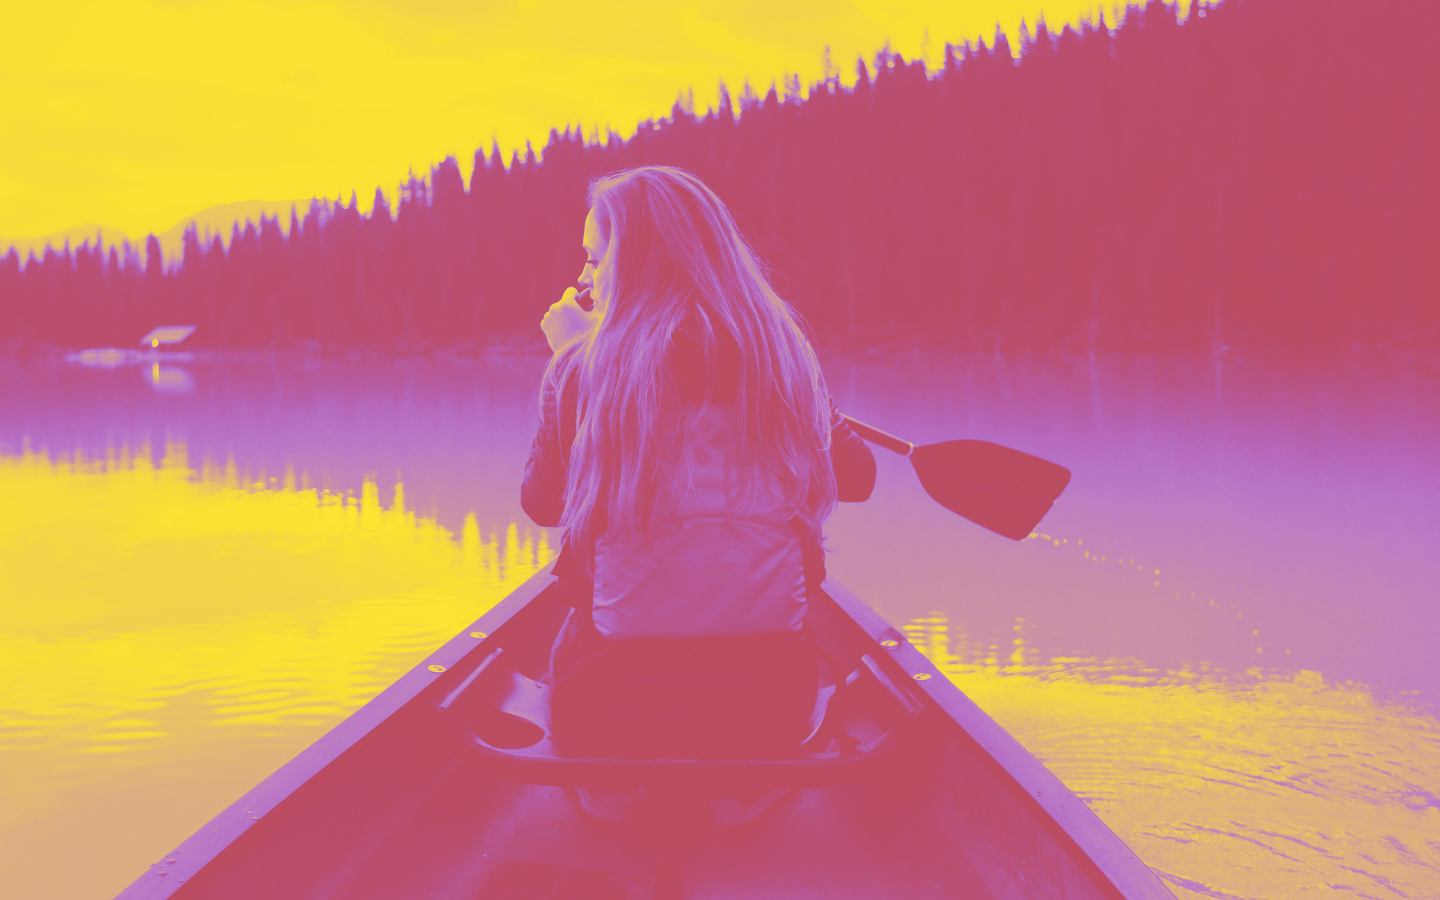
One of my favorite effects you can add to images is a duotone filter. In essence, this makes a photo look black & white, only black might be a deep blue and white show as bright teal (for example).
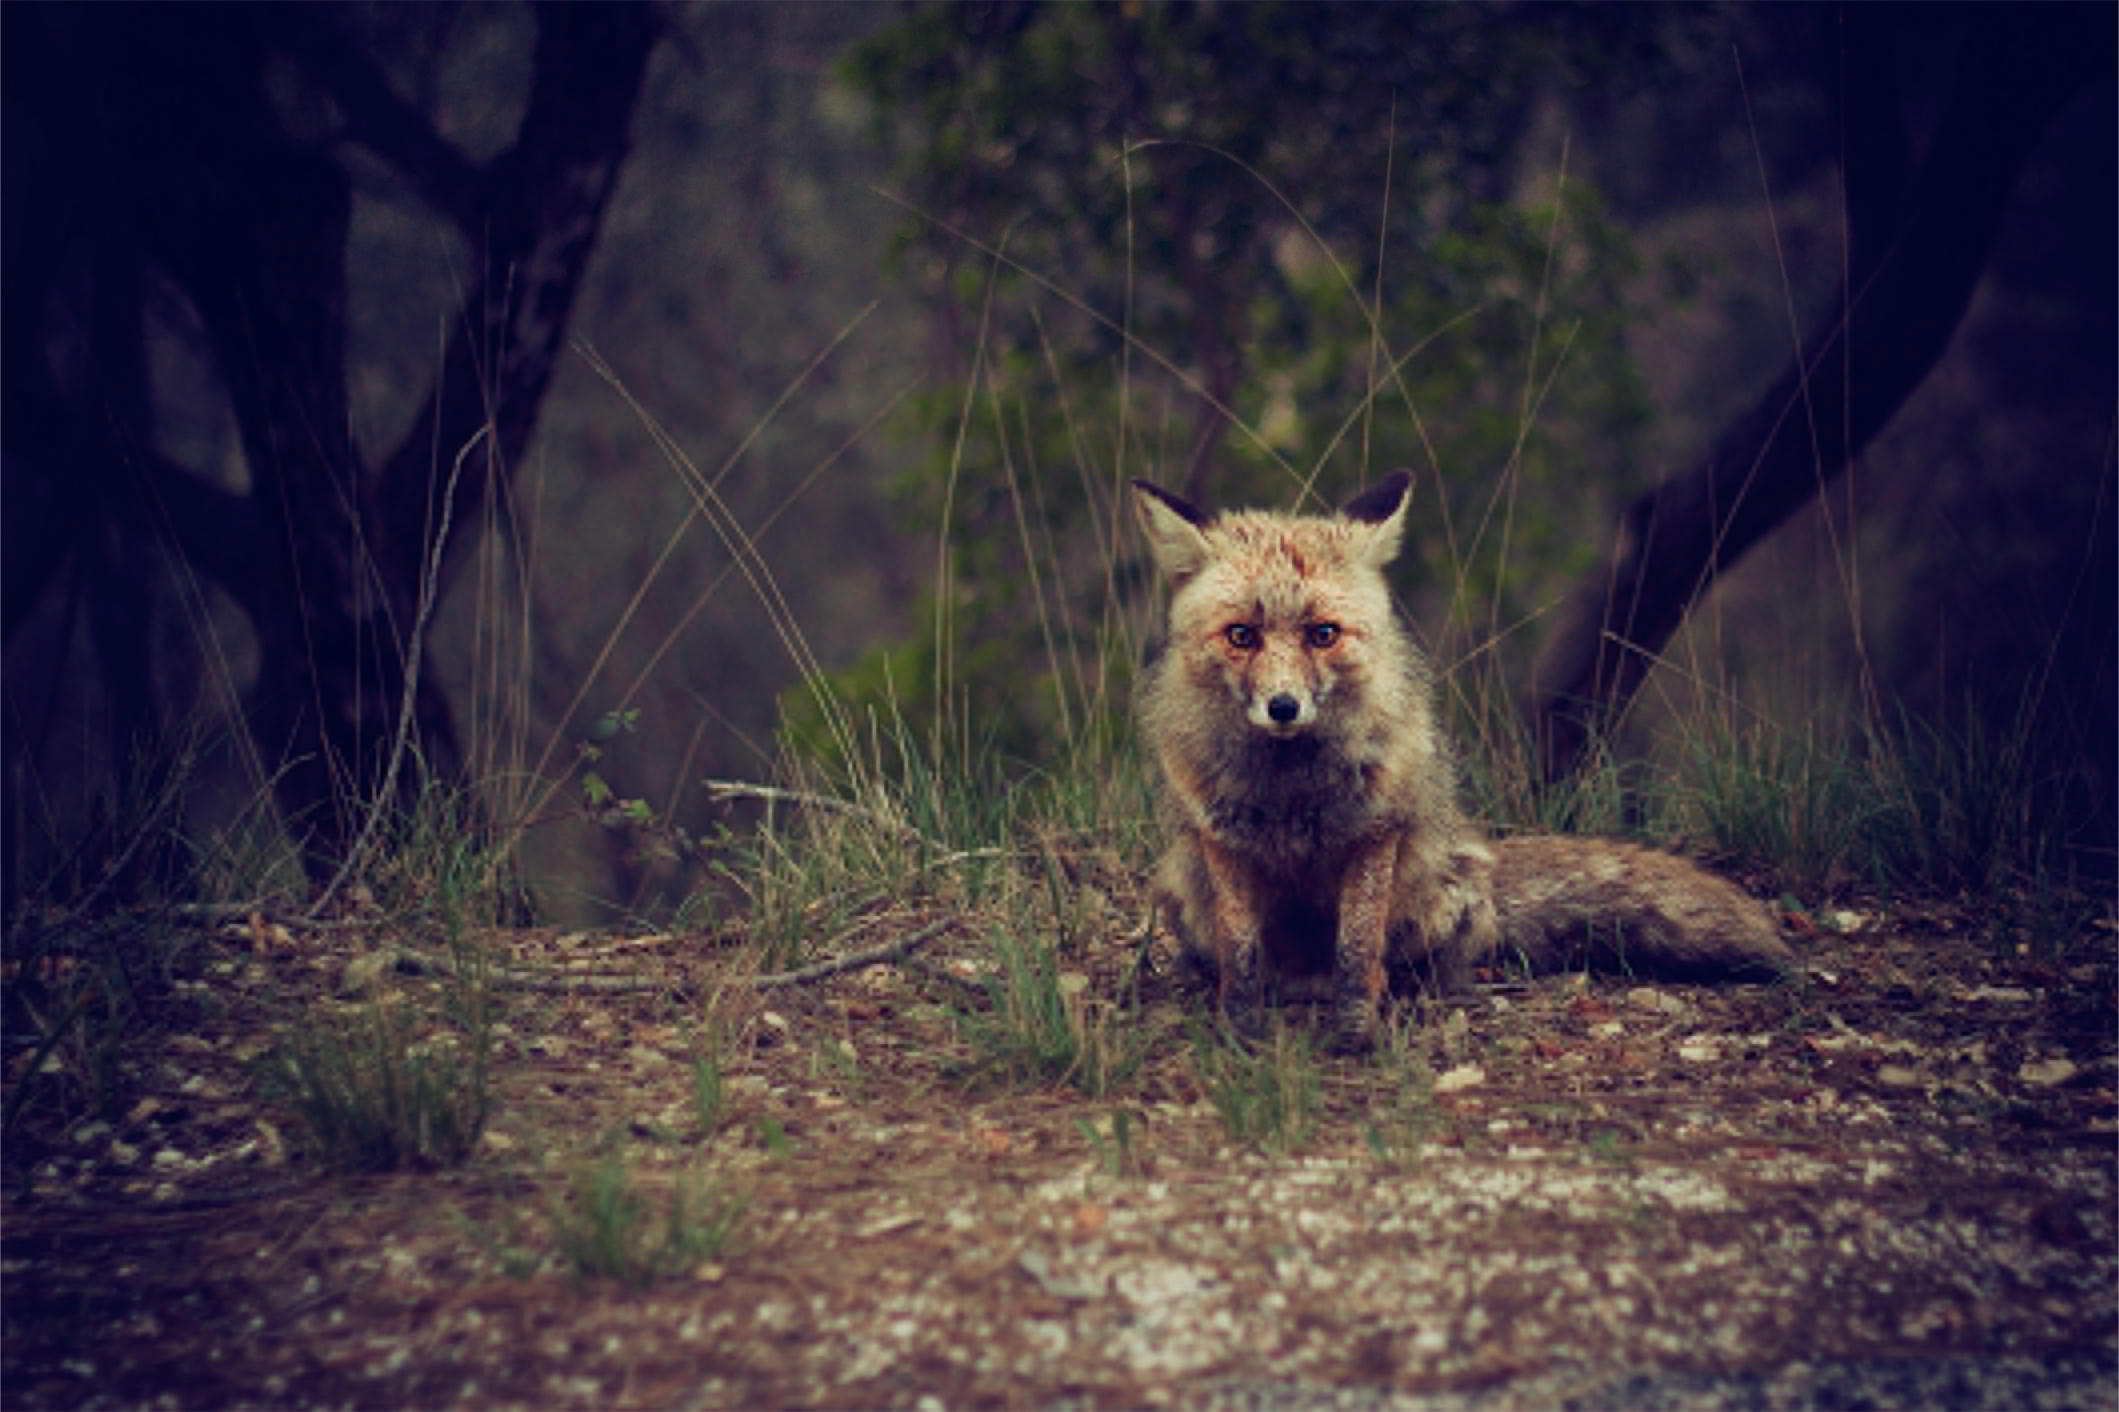
Note: The 3 filtered images above are rendered dynamically with JavaScript on canvas elements
In 2014, I helped develop an application for a Spotify campaign called Spotify - #thatsongwhen This website allows users to pick a song and add a story to it. But the added twist was being able to duotone your image with pre-defined set of color combinations (fitting Spotify’s brand). The app involved realtime duotone filtering in javascript on the frontend and backend ruby code to store and server pre-treated images from Amazon S3. Several other ad campaigns have used similar styling in the past few years.
Duotone filtering is some cool (and surprisingly simple) stuff so I wanted to share what I’ve learned. Here’s what you can expect below:
- Learn about the simple math behind image processing
- Follow steps to build a duotone image filter in javascript
- Try an interactive widget
- See how to implement with Ruby on Rails and ImageMagick
This is my time writing about coding, so please bear with me and leave comments if you like!
Image Processing Intro
I’m no expert on image processing, but I did take an “Introduction to Computer Vision” course in grad school, so I know enough to at least provide a rough introduction - especially since we’ll only be manipulating pixels.
You can think of any image as a matrix of pixels. An 800px by 600px image would be a matrix of size 800x600. Each of these “pixels” represents an array of RGB values that create a color. (Note that PNG images also have an alpha value to incidate opacity.) Hopefully you are familiar with RGB colors - that’s exactly how data is stored in these arrays to make a color.![]()
For operations you’d like to run on individual pixels (color filtering, for example) it’s safe to transform this matrix into an array of values for processing. For a typical image we need to keep in mind that each consecutive 4 values in this array represent one of the pixels in our image. Note that this would NOT be a good idea if you wanted to perform an operation that compared adjacent pixels, such as applying a Gaussian blur.
Creating a Duotone Image Filter
So how can we apply all of this to creating a new image filter? We’ll create our duotone filter using the following steps:
- Fetch the image pixels
- Convert to grayscale
- Build a color gradient
- Apply the gradient
There are many other ways to filter images on the web. Most of the resources I’ve come across use SVG filters, but I’ve found those not to look as “true” in terms of final result.
Getting the image “pixels”
Let’s start by fetching pixel data from our image. We’ll be using an image url since urls might be most common for applications with user-generated content. Before we can access the pixels, we will draw the image from the url on a canvas element.
var canvasId = 'idOfCanvasToDrawImageOn';
var imageUrl = 'crossOriginSafeImageURL';

var canvas = document.getElementById(canvasId);
var context = canvas.getContext('2d');

var img = new Image();
img.crossOrigin = 'Anonymous';

img.onload = function() {
  // Perform image scaling if desired size is given
  var scale = 1;

  context.canvas.width = img.width;
  context.canvas.height = img.height;
  context.scale(scale,scale);

  // Draw image on canvas
  context.drawImage(img, 0, 0);

  // Perform filtering here
};

img.src = imageUrl;
Then we’ll need to ‘grab’ the pixels from this newly created canvas image using the following function.
Filters.getPixels = function(img) {
  var c = this.getCanvas(img.width, img.height);
  var ctx = c.getContext('2d');
  ctx.drawImage(img, 0, 0);
  return ctx.getImageData(0,0,c.width,c.height);
};
Converting to grayscale
Once you have access to the pixel data, the first step to implementing a duotone filter on your image is to convert the image to grayscale. To get the most out of our two color choices, we’ll also maximize the contrast on the image. After we average the red, green and blue values we calculate maximum and minimum shades and map those to the range [0, 255].
Filters.grayscale = function(pixels) {
  var d = pixels.data;
  var max = 0;
  var min = 255;
  for (var i=0; i < d.length; i+=4) {
    // Fetch maximum and minimum pixel values
    if (d[i] > max) { max = d[i]; }
    if (d[i] < min) { min = d[i]; }
    // Grayscale by averaging RGB values
    var r = d[i];
    var g = d[i+1];
    var b = d[i+2];
    var v = 0.3333*r + 0.3333*g + 0.3333*b;
    d[i] = d[i+1] = d[i+2] = v;
  }
  for (var i=0; i < d.length; i+=4) {
    // Normalize each pixel to scale 0-255
    var v = (d[i] - min) * 255/(max-min);
    d[i] = d[i+1] = d[i+2] = v;
  }
  return pixels;
};
Building a color gradient
To apply a duotone filter to our image, we will need to replace our grayscale with a colorscale. This allows us to turn our blacks into color1 and our whites into color2. Building a gradient ensures that all those grays in between are assigned the appropriate color as well.

We’ll be building an array of 256 values between color1 and color2 to match the values from 0 (black) to 255 (white) represented by hexidecimal colors.
Filters.gradientMap = function (tone1, tone2) {
  var rgb1 = hexToRgb(tone1);
  var rgb2 = hexToRgb(tone2);
  var gradient = [];
  for (var i = 0; i < (256*4); i += 4) {
    gradient[i] = ((256-(i/4))*rgb1.r + (i/4)*rgb2.r)/256;
    gradient[i+1] = ((256-(i/4))*rgb1.g + (i/4)*rgb2.g)/256;
    gradient[i+2] = ((256-(i/4))*rgb1.b + (i/4)*rgb2.b)/256;
    gradient[i+3] = 255;
  }
  return gradient;
};
Applying the gradient
Finally, we need to apply our duotone gradient and reformat our pixel array into an image matrix.
Filters.duotone = function(img, tone1, tone2) {
  var pixels = this.getPixels(img);
  pixels = Filters.grayscale(pixels);
  var gradient = this.gradientMap(tone1, tone2);
  var d = pixels.data;
  for (var i = 0; i < d.length; i += 4) {
    d[i] = gradient[d[i]*4];
    d[i+1] = gradient[d[i+1]*4 + 1];
    d[i+2] = gradient[d[i+2]*4 + 2];
  }
  return pixels;
};
And that’s it. I encourage you to try these methods in your own code and tweak them as you like. The interactive widget below illustrates just one application of how this might be implemented (and to confirm that, yes, these functions do work as I’ve explained).
Interactive React Component
Use the color selectors below to change the colors on the associated image automatically. The component below is a dynamic React component.
Bonus: ImageMagick + Ruby on Rails
JavaScript image filtering has plenty of problems. It can be slow for large images and there are heaps of issues related to getting the right permissions to access image data through canvas elements for uploaded images. As a result, you’ll want to store your images with their filter.
ImageMagick is a really powerful software suite for image processing that can be run on anything from the command line to Python or Ruby. It might be a more realistic option (though less fun) than rendering these images in Javascript. Once you get ImageMagick up and running, you can render duotone images from the command line using the filter I wrote below. Combine this with your coding language of choice and you’ll be saving funky photos in no time.
# Swap out DARK_COLOR and LIGHT_COLOR with hex values (i.e. #66caca)
$ convert image.png -colorspace gray
  ( -size 20x256 gradient: -rotate 90
    ( -size 1x1 xc:DARK_COLOR xc:LIGHT_COLOR +append )
    -interpolate Bicubic -clut )
  -interpolate Bicubic -clut -interlace Line -quality 100
  image-duotone.png
Paperclip is a commonly-used gem to use for attaching images and files to objects in Ruby on Rails. If you’ve used it before, you’ve probably done some image processing already such as resizing. Fortunately, Paperclip is fully integrated with ImageMagick so can use this same filter there.
:convert_options => your_filterYou’ll need to do some escaping on characters to make it work properly, but I’ll leave that up to you and your own implementation.
Not a developer?
If you have access to Adobe Photoshop, you too can make beautiful duotoned images! Adobe does a good job of explaining it all here, so just check out the link below.
https://helpx.adobe.com/photoshop/using/duotones.html
Questions, Comments, Suggestions?
Please write them down below! This is my first shot at a technical blog post so any feedback is happily accepted. I’d also love to hear about ways you may have implemented this in your projects.
When I have more time I’m hoping to put together a React module or at least place some of this code in a public Github repo.
If you like what you see please link back to my website and this blog post — it would be hugely appreciated.